@Kudozza is a Microsoft Teams application which focuses on increasing appreciation within an organization with the help of kudos. All with the goal of strengthening the team culture. If you want to read more about how @Kudozza is helping you with your team culture, visit our WHY Kudozza webpage.
For your convienience we have recorded the initial installation procedure and the rollout suggestions.
The installation guide explains how to install @Kudozza for the very first time and show the most important configuration settings.
If you want to rollout @Kudozza to the complete organization, the rollout guide will demonstrate how you can use the Teams Admin Center to install an app globally (or for a specific group of users/teams) using the build-in Teams functionality.
The most important steps from the video are also written down below. Especially important are the addition of further administrators and the granting of Teams permissions steps that should be performed after the installation.
Installation
Teams apps have different modes and thus possibilities to interact with the team members and users.
For the various modes of @Kudozza see the
Anatomy of Kudozza
.
Install in a team (required)
@Kudozza requires to be installed in at least one team.
This is because @Kudozza piggy backs on Teams permissions. Each person allowed to install the @Kudozza app to a Team is also added to the administrator list of @Kudozza.
Without at least one team installation, there is no access to the administration area of it.
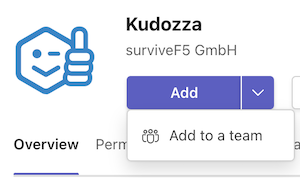
To install @Kudozza in a team, open @Kudozza in the Microsoft Teams Appstore and choose the “Add to a team” option.
Choose a team&channel from the selection box and click the “Set Up” button.
You’ll see a short introduction dialog and with the press of Save the @Kudozza bot is installed in the corresponding team (and is accessible in all channels of the team).
In addition, the channel tab of @Kudozza is installed but only in this one specific channel that was selected.
You can verify the successful installation by checking for the small @Kudozza button in the toolbar below the message box:

This process does not need to be repeated for other channels in the same team as the @Kudozza bot is installed team wide.
Rollout to multiple teams
Installing @Kudozza in one single team is sufficient for a test run. However, for a company wide usage, it is recommended to install @Kudozza in as many teams as possible so it is omnipresent to the user.
To make sure @Kudozza is installed in all new teams you can setup a Microsoft Teams template with Kudozza included from which new teams are then created.
If this is not an option, and also if you have many existing teams and do not want to add @Kudozza manually, you need to involve scripting. If you are into Powershell, this page might get you started, otherwise you can contact us for a javascript that can be run periodically as a cloud function to make sure @Kudozza is installed in all teams.
Install team tab
The “Team tab” is optional and not required for @Kudozza to work (only the above described team bot install is absolutely mandatory).
However, it is highly recommended to install it in at least one channel of a team as it provides team specific user and kudos statistics.
To install a @Kudozza tab in any channel, just select the + sign next to a channel tab list and search for Kudozza.

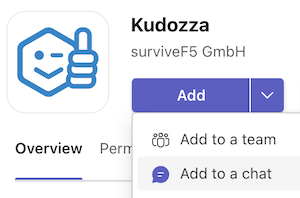
Install into a chat
@Kudozza can also be used in a chat. This again requires an installation of the @Kudozza bot and optionally the tab into a chat. The process is the same as described above with the team but instead of “Add to a team” choose “Add to a chat”.
Chat based kudos giving can be disabled in the administration area of @Kudozza. Check the configuration guide for more info.
Setup personal mode
@Kudozza can be opened in personal mode as well. This gives access to some personal user settings but also to the administration area of Kudozza.
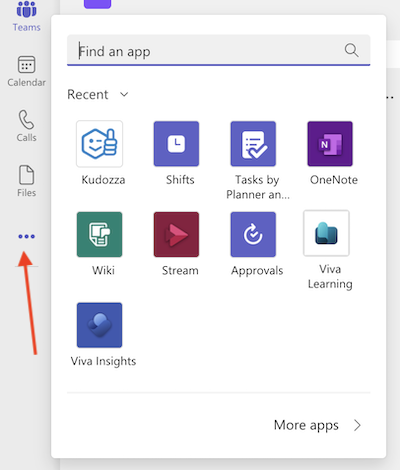
To open in personal mode, @Kudozza needs to be opened from the left sidebar.
To add it there, select the three dots, and search for Kudozza.
To keep it always visible, you can right click the @Kudozza symbol in the left sidebar and select Pin.
If you want to add @Kudozza to all users' sidebars by default, visit the Teams Admin Center->Teams App->Setup policies section and change your policy to add @Kudozza into the sidebar of all users.
Add additional administrators
@Kudozza has its own administration section which can be found when opening @Kudozza in personal mode and selecting the “Settings->Administrators” menu.
This section has limited access as it shows org wide statistics and allows to configure some global settings (like tags and challenges).
To be as discoverable as possible, everyone who installs @Kudozza in the personal scope is added as an Administrator to Kudozza in the free plan. In paid plans, everyone who has installed @Kudozza to a Teams team is added to the @Kudozza administrator list by default. However, it is possible to also manually add people here (e.g. the HR manager who configures the non technical parts of @Kudozza).
In paid plans it is also possible to switch off this “auto-admin” feature and only allow for managed administrator addition.

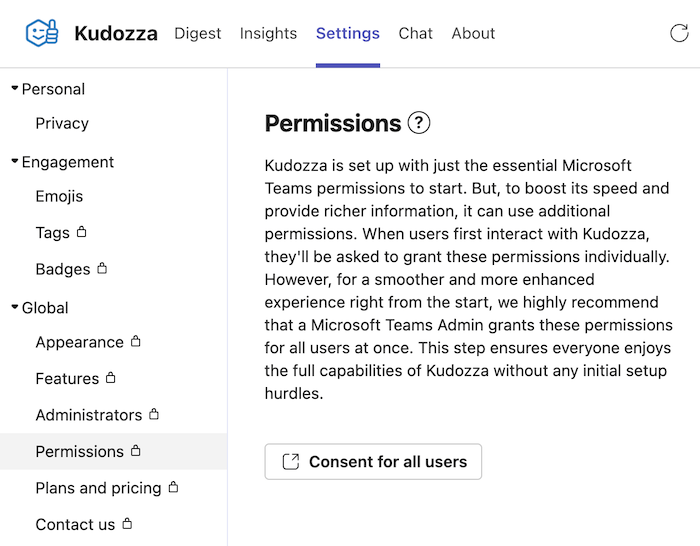
Grant Teams permissions ⚠️
@Kudozza is initially installed with just a minimal set of Microsoft Teams permissions. This is sufficient for its evaluation and for the usage within a few and small teams.
For richer and better performing operations however, @Kudozza needs some more permissions (e.g. showing user avatar images in the user overview and way faster Kudos Digest pages. On pages which benefit from more permissions, @Kudozza is asking every user for these permissions (yellow bar on top of the page). This is a suboptimal user experience so it is heavily recommended that these permissions are granted by a Teams administrator for the whole organization.
To grant these permissions, use the “Consent for all users” button on the “Settings->Permissions” page.
The alternative for an administrator is to visit the Kudozza configuration in your organizations Teams Admin center, select “Go to Azure Directory” and “Grant admin consent” there.
Next steps
@Kudozza benefits from being tailored to your organization. If you are an admin, check the configuration guide .